FAQ
Can I move a software license to another machine, once a license was activated?
It is impossible to transfer a license to another machine, once a license was activated. You can install the software on another machine. But you will need to generate a new license file.
Do I need to generate another license in case more terminals were purchased?
No, you do not need another license file in case more terminals were purchased, you simply need to update an existing license file.
How Can I Find My Hardware ID?
To display your Hardware ID, from IdentyTech Configuration Manager (Start->Programs->IdentyManage-> Configuration Manager), click Get Hardware ID.
An example of a Hardware ID is: BF9000Z4S12652
Please Note: The “Hardware ID” is NOT a serial number that appears on the boxes with a shipped products.
If you cannot find the Hardware ID for the product you are activating, please contact IdentyTech Solutions Support Team at: support@identytech.com, for inquiries within USA please contact our US Team at: supportus@identytech.com .
How Do I generate a license file?
To retrieve a Hardware ID, open “Configuration Manager” (Start->Programs->IdentyManage-> Configuration Manager), and click on “Get Hardware ID” button. Copy the number that appears on the screen.
Please note: IdentyManage software or IDT-SDK must be installed prior to license generation.
Browse to http://crm.identytech.com, “License” section. Click on “Generate license” button and paste previously copied Hardware ID. You can also mark modules and choose a relevant Sub-company in case available.
Click on “Generate” button. The system will automatically generate the license file.
In order to download the license file, press the “Download” near the Hardware ID in the list.
How Do I update a license file?
In case more terminals were purchased by the customer and needs to be used by the software, it is required to update a license file.
This can be simply done by logging into the CRM portal –> Licenses section.
To update a license file simply click the “Download” button near the hardware ID of your PC in the list.
This will download an updated license file.
After the license file is downloaded, please apply it by using a “Configuration manager”.
I forgot my password for IdentyTech CRM account
In case you forgot a password for IdentyTech CRM account, please navigate to https://identytechcrm.com and click ““. You will receive a password recovery email.
Are the licenses product and version dependent?
Yes. All existing licenses for IdentyManage Pro (v9.2 and below) and IDT-SDK (v9.1 and below) have been marked as Legacy licenses. Future versions of our softwares will be licensed per release.
Please contact our sales team at salesus@identytech.com to purchase an upgrade.
Can the terminals be found through the different segments on the network?
In case the segment are properly “connected” in the router and all required ports are used, there is no problem to search the units through the different segments.
Please advise your network specialist prior to installing the units through different segments.
Fingerprint desktop sensor sensor is not acquiring image
Please verify that the sensor drivers were installed. The drivers are installed automatically with the installation of the software. If the drivers were not installed, please remove the software and reinstall it again.
If the issue still occurs, please verify that you have the following components installed:
- Visual C++ Redistributable 2005 installed.
- Lumidigm Device Service Packages Deployment v5.30.50
Please download and install missing components. Close and Restart the software and retry capturing process.
How Do I change the IP address of the terminal
In order to change the IP address of the terminal please do the following steps.
- Open the management software and click on “Zones and devices” icon.
- On the “Site map” tree, mark the device you are willing to set ip to.
- Click on the “Set IP” button on the top of the screen, or right-click the terminal and choose “Set IP“.
- Specify new IP settings, and press “OK” to apply the new settings. The terminal will reboot and load with new IP settings.
Please note: The unit with incorrect IP settings will be lost.
In case you are willing to reset the IP settings to the default IP settings(for example: if you don’t know what the current address of the terminal is) please refer to the following article which will guide you through the reset process.
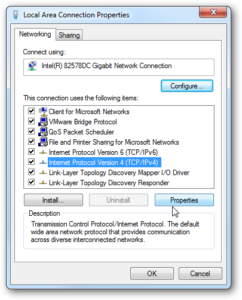
How Do I set a static IP address on my PC?
To change the computer’s IP address open a Control Panel and navigate to “Network and Internet à Network and Sharing Center”
Then when the Network and Sharing Center opens, click on “Change adapter settings”. This will be the same on Windows 7 or 8.x. Right-click on your local adapter and select Properties.
In the Local Area Connection Properties window highlight Internet Protocol Version 4 (TCP/IPv4) then click the Properties button.
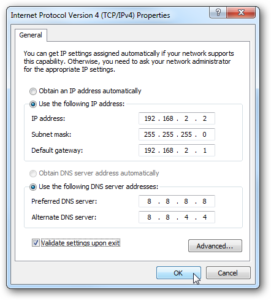
Now select the radio button “Use the following IP address” and enter in the correct IP, Subnet mask, and Default gateway that corresponds with your network setup.
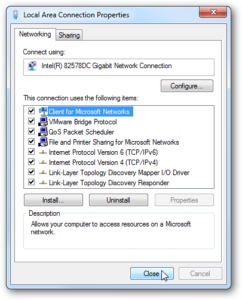
Now close out of the Local Area Connections Properties window.
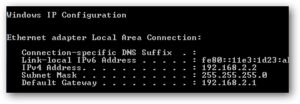
Now you can open the “Command prompt” and do an ipconfig to see the network adapter settings have been successfully changed.
No terminals appears in the software (in the search area)
There might be a various reasons for that:
- Check that the ports required by the application are added as exceptions in your firewall. Please note: Application’s installer is adding those ports automatically to the local firewall as exception during the installation. In case you have an additional (corporate) firewall that might block this ports through your network, please add the exceptions for the required ports manually.Click hereto see what ports are required.
- You computer has more than 1 active network connections. Please disable one of the cards (that is not used for communicating with the terminals) or assign the priority to the network card that is used for communicating with the terminals.
- Your license is does not contain this terminals. Please create a valid license or update a current license.
- The port 5001/1046 (unless changed) on which the search is operating might be use by another application or process. To verify that you can download a “TCPView” software that will show you detailed listings of all TCP and UDP endpoints on your system.Click hereto download. Close all other processes that are using the ports 5001/1046 and reopen the “Zones and Devices” window.
Palm secure desktop sensor is not acquiring image
If you are experiencing this issue, please verify that the PalmSecure drivers were installed.
If this issue occurs on Windows 8 / Windows 8.1 machines, the PalmSecure drivers were not installed properly. Please uninstall the drivers and reinstall as described in the article: “Installing PalmSecure drivers on windows 8 & 8.1″.
The PalmSecure drivers can be downloaded from the CRM portal, “Download” section.
Software is installed but won’t start up
There might be a various reasons for this issue. Check out one of the following steps in order to find a solution:
- Administrator privileges might be missing for your user account. The user account must have an administrative rights in order to access system folders and services. To fix this issue, run a software as an Administrator (Right click on the “IdentyManage Software” icon and choose “Run as Administrator” from the menu).
- The software does not have a valid license. In order to create a new license please copy your “Hardware ID” using the “Configuration manager”, log in into the CRM portal, navigate to “Licenses” section and generate a license for your PC.
- The database is inaccessible or connection string to database is incorrect. In case the software was installed using a remote “SQLServer” engine (SQLServer installed on another machine) please verify that the remote PC is online. In case the “Database connection” string is incorrect, please proceed with the following steps: Open the configuration manager, press “Settings” button and delete the value that appears in “Database connection string”. Click “Set” button in order to save the changes. Reopen the IdentyManage software. You will receive a message that there is no valid database connection is defined and automatically transferred to “Database Configuration” window. Choose desired “SQLServer” instance and click on “Test connection” button. Once you will receive a message of successful connection, press “Save” button to apply new settings. The application will start loading.
- In case the software was upgraded from IdentyManage v8.15 or lower that was previously installed with “SQLite” database type. Delete the IdentyManage software and during installation choose “SQLServer” database type. (The installer will automatically install and create the required database.)
- The software was installed with “SQLite” database option marked through the installation instead of “SQLServer”. The “SQLite” database is no longer supported by IdentyManage software. Please uninstall and reinstall the software using one of the “SQLServer” database options.
Whats is the default username & password for IdentyManage software?
The default username is: “Administrator”, not case-sensitive.
The default password is set by the user, on first software run.
Support articles
Identytech licensing system
Each copy of software requires its unique license, based on unique identifier of the computer (Hardware ID). It is impossible to run the software without a license even for a trial period.
Each IdentyTech customer receives an access to IdentyTech CRM account and the option to create a licenses, based on the number of the licenses that were purchased. Also, all the terminals purchased by the same customer appears on his CRM account.
Basic software license enables all standard features allowing the customer work with a terminals. The software will recognize and work only with the terminals that appears in the license file. While generating a license file, all the terminals purchased by the customer will automatically appear in the license. There is an option to manually choose the terminals that would appear within the license, in case the customer is registered as an “Integrator”(reseller). In case that more terminals were purchased by the customer, license file can be easily updated by re-downloading a file from IdentyTech CRM (there is no need to generate additional license file).
In addition to a basic software functionality, there are various optional modules available. Those can be enabled by the license (modules are purchased separately and not enabled by the basic license). The license can be extended for additional modules while generating a license file in case there are additional modules credits available.
Each license that was created is permanent and cannot be deleted or transferred to another PC. There is no option to modify a Hardware ID after the license file was generated (basic license can be extended for use with additional modules by simply editing the license file, there is no need to generate additional license file).
The licenses are created by the customer itself, and NOT via sending the request to the Support Team.
In case there is no license credits available, please contact our Sales Team at: salesus@identytech.com.
Getting started with the CRM portal
Each IdentyTech customer will receive an email form support@identytech.com which will invite him to register in IdentyTech CRM portal.
The registration process is very simple. In order to register, the customer should press on the link in the received email, and create an initial password.
Once registered, the customer can login with the registration details (username and password provided through registration) into: https://identytechcrm.com
Once logged in to the CRM portal, the customer will be able to download the latest software, firmwares, manuals, documentation and generate licenses for the management software.
Also the CRM contains a simple ticketing management system, allowing the customer easily open maintenance & repair requests.
To get started, the customer can refer to the manuals available in the CRM portal which will guide him through the installation and initial setup processes:
– “IdentyManage software manual.pdf” – detailed explanation on how to install and use IdentyManage software
– “IDentytech CRM Portal Manual v2.pdf” – detailed explanation on how to use a CRM portal
Our Support Team will be happy to assist in case of any questions or issues. Don’t hesitate to contact us at: support@identytech.com.
Getting started with the IdentyManage
1. Start IdentyManage software by double-clicking on “IdentyManage Software” icon on your desktop.
Please note: The license has to be activated prior to using management software.
2. On the first software run, you have to set the password for the “Administrator” account.
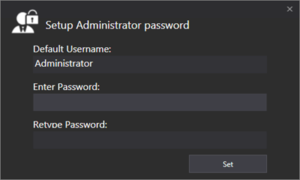
Please choose a password and enter it to the relevant fields, and press “Set” button to continue.
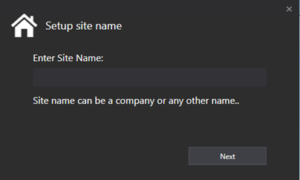
3. After the password is set, you will need to choose a “Site name”. The “Site name” can be a company name, installation site name, building name etc..
4. After setting up the site name, the software “Login” screen will appear. Log in to the management software:
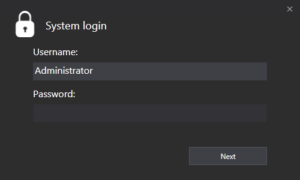
The default username: Administrator (case sensitive) and type as a password the one that was set on the first software run.
5. Click on the “Site map” icon:
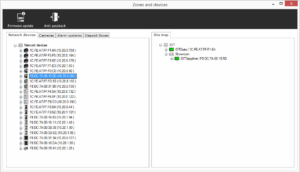
Your device should appear at the “Network devices” part of the window as shown on the picture below. In case that the device does not appear on the “Network devices” tree, please refer to our support portal (http://support.identytech.com/faq ) – FAQ section for troubleshooting.
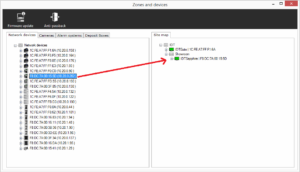
6. Drag and drop the device to the “Site map” part of the window, under the any node.
If device has a default IP address (192.168.1.1) it cannot be dragged to the map unless the IP address is changed. To change the IP address, right-click on the device and choose “Set IP” from the menu.
If the device is DHCP state, while dragging, the IP address will change to static and reboot. Please refer to the full software manual for more detailed explanation on how to change the IP address.
7. Once the site map is setup and all the relevant units are added to the site map, you can proceed to enrolling users into your system. To do so, click on the “Users” icon in the main menu.
The following window will show up:
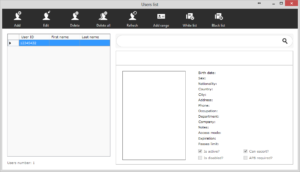
8. Press “Add button” in the window menu. The following window will show up:
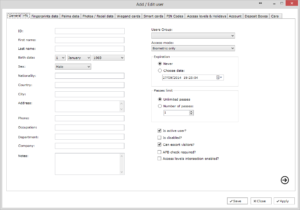
Under the “General info” tab, please type in the User ID (MUST field). You can also specify any additional user details such as User name, date of birth etc. In the Access mode field, specify the credentials that user is going to use in order to be identified in the system: Biometric only, card & biometric, Pin code etc., the default access mode is Biometric only – meaning that the user will have to present palm / or finger only (depending on the type of the terminal) in order to be identified in the system.
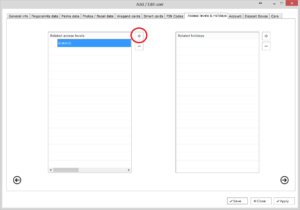
9. Next, navigate to “Access levels & holidays” tab. By default, there is 2 access levels specified in the system: ALWAYS (full access) and NEVER (no access). Additional access levels can be created for a custom access permissions. Please refer to the full software manual for a more detailed explanation.
Click on the “+” button next to the “Related access levels” list and choose “Always” from the list and click the “OK” button. The access level should appear under “Related access levels” list as shown on the picture below.
10. Depending on the type of the biometric you want to enroll please navigate either to “Fingerprint data” or “Palm data” tabs. In case you have a local desktop sensor connected to your PC, choose “Local enrollment” option. In case you are enrolling on the terminal, choose “Network enrollment” option, click on the “…” button and select the unit you will enroll on from the list.

Press “Enroll button”. Present your finger or palm to the terminal or desktop reader. Once enrollment complete, the green check mark will appear on the relevant picture.
Please note:
- In case you see the zip sign instead of fingerprint image, please consider re-enrollment, unless the template is used for verification.
- The palm enrollment on the terminal itself can be a bit “tricky”. Please use a hand guide for enrollment. Once hand presented wait until unit beeps ones and green led comes on. Then remove your hand and present it again. Wait until you hear a beep once again and both led’s turns on green. If you hear double-beep, the procedure wasn’t complete correctly and enrollment failed. It is recommended to use a local USB sensor for enrollment.
11. Press save button to save user on the unit. Before you saving make sure the unit is connected to the network. Complete the enrollment process. Please note: there is no need to click apply button after every enrolled palm or fingerprint. It is enough to click a “Save” button after all the necessary details are filled in.
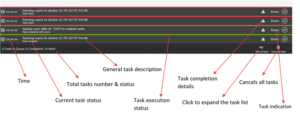
12. Once user was saved, the new task will be created and appear at the bottom of the screen. The green color will represent that the user was synchronized to the units successfully, the red one – task failed, orange – represent that task was completed with errors (the user data wasn’t synchronized to all terminals).
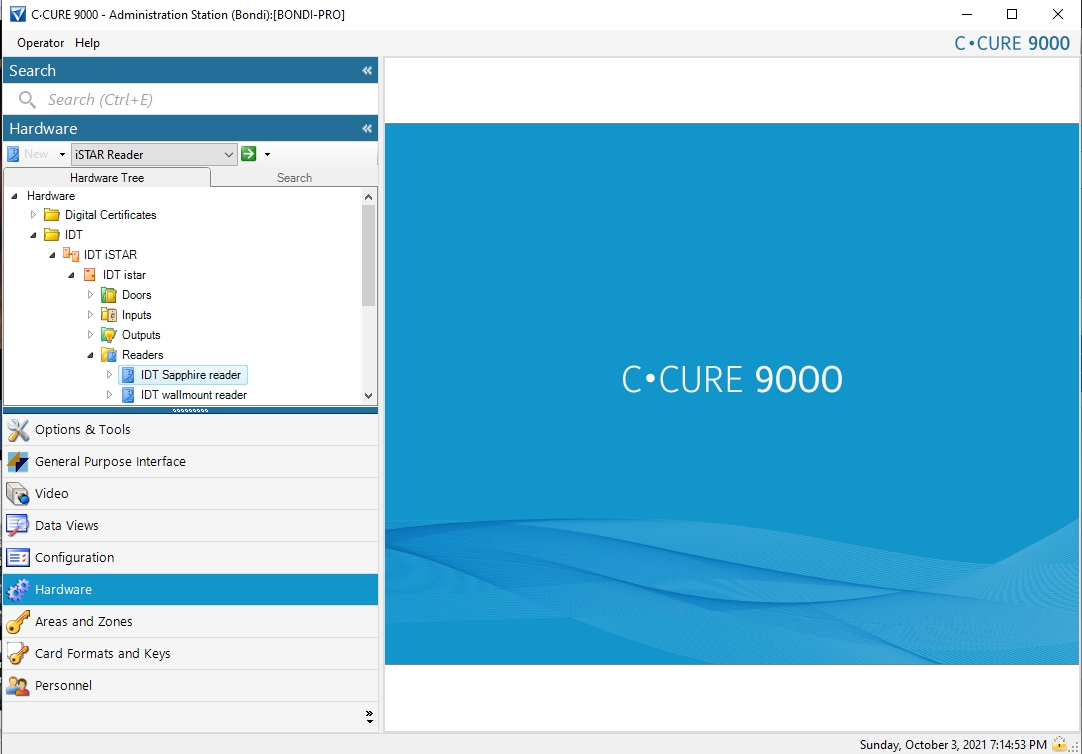
Compatibility matrix
| Standalone: 2.4 / 2.41 / 2.5 / 2.6 / 2.7 Enterprise: 2.5 / 2.6 / 2.7 | |
| Partner | IdentyTech Solutions |
| Partner product version | Terminals: IDTAccess / IDTSapphire / IDTJade / IDTGate / IDTWallmount / IDTJet / IDTOnyx. Firmware version v12.08.585 or higher |
| Integration driver version | 2.1 |
| C-CURE 9000 license option | CC9000-IDENTY |
| Enterprise certified | Yes |
| Redundancy certified | Yes |
| Supported server OS | 32 bit: Windows 7/8/8.1/10 any editions 64 bit: Windows 7/8/8.1/10, Windows server 2008/2012/2016 any editions |
| Supported client OS | 32 bit: Windows 7/8/8.1/10 any editions 64 bit: Windows 7/8/8.1/10, Windows server 2008/2012/2016 any editions |
| Driver software | Once driver is purchased from SW house, please email our support team with your purchase confirmation to obtain an installation software. In order to use a driver with C-CURE 9000 ‘IdentyTech Reader Integration’ license option is required to be added to you C-CURE license. |
| Tech support | Request support |
Ports required by integration
The following ports are used by IdentyTech reader integration. During the driver installation the listed ports will be automatically added as a firewall exception, however if your network policy is controlled by corporate firewall, these have to be opened manually in order for the integration to function properly.
7000 TCP – Unit communication protocol
7001 | 7060 UDP – Network device search
7002 TCP – Real time monitoring notifications
7003 TCP – PC identification service
7004 TCP – Enrollment with local sensor
Please note: the ports cannot be changed in this version of the driver.
Supported Wiegand card formats
This integration supports any Wiegand format defined by the customer in C-CURE 9000 software that meets the following requirements:
- The format must contain up to 4 parities. Formats with more than 4 parities are not supported by this integration.
- Proprietary Wiegand formats defined in the C-CURE 9000 or ones that contain Card data fields of: Card status | Expiration date | Fixed binary | Fixed data | Issue code | Site code | Unknown – are not supported by this integration.
- Formats defined by user must meet the following requirements:
1. Card data fields has to be of the following types:Card number, Card facility code
2. Parity fields has to be of the following types:Even parity, Odd parity
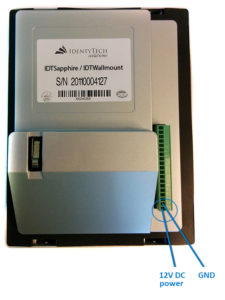
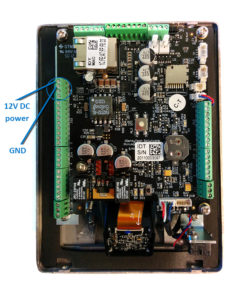
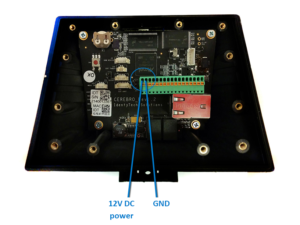
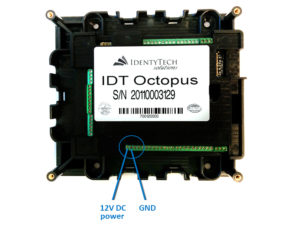
Connecting power supply to the terminals
- IDTSapphire / IDTWallmount units
- IDTJade / IDTAccess units
- IDTGate units
- IDTOctopus (MiniMoac) units
Getting started with IDT-SDK v9.0
Supported operating systems
Windows 7 x86, x64
Windows 8 x86, x64
Windows 8.1 x86, x64
Window 10 x86, x64
Windows Server 2008 x64, Any edition
Windows Server 2012 x64, Any edition
Windows Server 2016 x64, Any edition
Please note: Operations are not guaranteed with other Operating systems.
Supported devices & firmware versions
Identytech devices of type:
IDT Sapphire
IDT Wallmount
IDT Acess
IDT Jade
IDT Gate
Octopus
IDT Nano PS
IDT Nano FP
IDT 750 PS
IDT 750 FP
IDT Jet
IDTOnyx
Please note: The SDK supports Firmware versions v14.90.x and higher.The devices with following firmware versions must be updated prior to using the SDK.Operations are not guaranteed with versions below v14.90.x.
Application configurations
The following is the list of supported configurations for compilation of your application
————————————————————————
x64 OS (64 bit machines)
————————————————————————
Running as Any CPU or 64 bit process
The following configuration is supported:
Platform Any CPU Platform target: Any CPU
Platform Any CPU Platform target: x64
Platform x64 Platform target: x64
The following dlls has to be copied to your bin\Debug folder
dlls\Scanners\FP\Innovatrics.IEngine.dll
dlls\Scanners\FP\x64\LumiInOpAPI.dll
dlls\Scanners\FP\x64\LumiCore.dll
dlls\Scanners\FP\x64\LumiAPI.dll
dlls\Scanners\FP\x64\libiomp5md.dll
dlls\Scanners\FP\x64\IDKit64.dll
dlls\Scanners\FP\x64\IDKit.dll
dlls\Scanners\Palm\x64\F3BC4BIO.DLL
dlls\Scanners\Palm\x64\F3BC4BSP.DAT
dlls\Scanners\Palm\x64\F3BC4BSP.DLL
dlls\Scanners\Palm\x64\F3BC4CAP.DLL
dlls\Scanners\Palm\x64\F3BC4COM.DLL
dlls\Scanners\Palm\x64\F3BC4FRM.DLL
dlls\Scanners\Palm\x64\F3BC4MAT.DLL
dlls\Scanners\Palm\x64\F3BC4TIC.DLL
dlls\Scanners\Palm\x64\PvAPI.INI
dlls\Scanners\Palm\x64\PvFw64.dll
dlls\Scanners\Palm\x64\PvsApiIfCtrl64.dll
The following folders with it’s contents has to be copied to your bin\Debug folder
dlls\Scanners\FP\x64\SPM
dlls\Scanners\FP\x64\plugin
Running as 32 bit process on 64bit machine
The following configuration is supported for communication with terminals only.
No enrollment with Fingerprint / Palm USB sensors is supported:
Platform x64 Platform target: Any CPU
Platform x32 Platform target: x32
Platform x32 Platform target: Any CPU
Platform Any CPU Platform target: x32
————————————————————————
x86 OS (32 bit machines)
————————————————————————
The following configuration is supported:
Platform x32 Platform target: x32
Platform Any CPU Platform target: Any CPU
Platform Any CPU Platform target: x32
The following configuration is not supported:
Platform x32 Platform target: Any CPU
The following dlls has to be copied to your bin\Debug folder
dlls\Scanners\FP\Innovatrics.IEngine.dll
dlls\Scanners\FP\x32\LumiInOpAPI.dll
dlls\Scanners\FP\x32\LumiCore.dll
dlls\Scanners\FP\x32\LumiAPI.dll
dlls\Scanners\FP\x32\libiomp5md.dll
dlls\Scanners\FP\x32\IDKit.dll
dlls\Scanners\Palm\x32\F3BC4BSP.DAT
dlls\Scanners\Palm\x32\F3BC4BSP.DLL
dlls\Scanners\Palm\x32\F3BC4CAP.DLL
dlls\Scanners\Palm\x32\F3BC4COM.DLL
dlls\Scanners\Palm\x32\F3BC4FRM.DLL
dlls\Scanners\Palm\x32\F3BC4MAT.DLL
dlls\Scanners\Palm\x32\F3BC4TIC.DLL
dlls\Scanners\Palm\x32\PvAPI.INI
dlls\Scanners\Palm\x32\PvFw.dll
dlls\Scanners\Palm\x32\PvsApiIfCtrl.dll
The following folders with it’s contents has to be copied to your bin\Debug folder
dlls\Scanners\FP\x32\SPM
dlls\Scanners\FP\x32\plugin
Please note: Operations are not guaranteed with a configuration different from the one listed above
Enabling remote connection on SQLServer
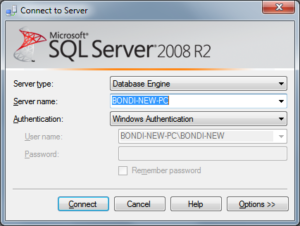
Open “SQLServer Management Studio”. On the connection window, press connect to connect to a server:
On the object explorer window:
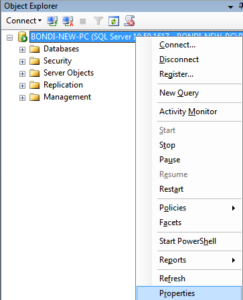
Right Click on the server name, and click “Properties”.
The following window will show up:
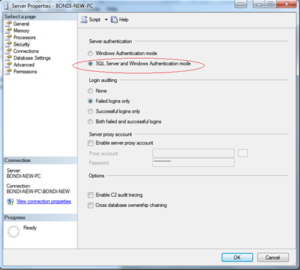
Make sure that “SQLServer and Windows Authentication mode” is marked if not, mark this option and press ok. Close properties window.
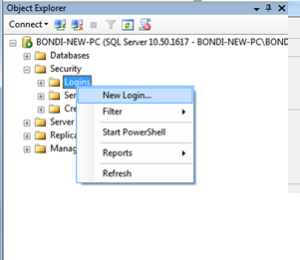
On the object explorer window choose:
Security -> Logins -> New Login as shown below:
The following window will open:
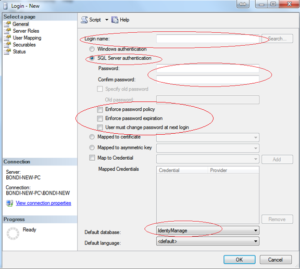
On the general window properties:
- Enter a login name
- Choose SQLServer authentication option
- Specify a password and confirm it
- Unmark the following: “Enforce password policy”, “Enforce password expiration” and “User must change password on next login” options
- On “Default database” choose IdentyManage
Click on “Server Roles” on the left side of the window as shown below:
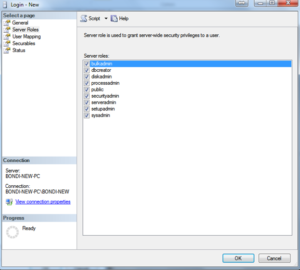
And mark “sysadmin” option in this window.
Then navigate to “User mapping” window:
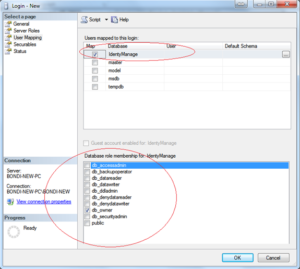
On the “Users mapped to login” part mark “IdentyManage”
On the “Database role membership for: IdentyManage” part, mark “db_owner” checkbox.
Press OK and close SQLServer management studio.
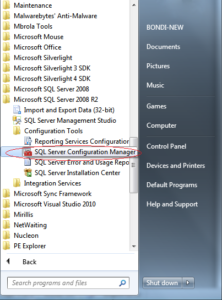
Navigate to Start -> All programs -> Microsoft SQLServer 2008 R2 -> Configuration tools -> Configuration Manager:
On the right side of the opened window click on” SQLServer Network Configuration” and choose the desired instance, for example: “Protocols for SQLEXPRESS” as shown below:

On the left side, right click on “TCP/IP” and choose “Enable” from the menu.
Click on “SQL Server Services” on the menu at the left side, choose your instance, for example: “SQLServer (SQLEXPRESS)” and restart the service as shown below:
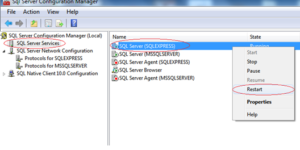
Now your instance will support remote connection. In case you are still unable to connect, check that your firewall is not blocking a port: 1433. In case it does, add a firewall exception for this port on both remote and target machines.
Installing PalmSecure drivers on windows 8, 8.1 and 10
Palm secure drivers are not digitally signed. Therefore it is required to disable driver enforcement signature in order to install those drivers properly. The following guide will explain how to cancel Driver signature enforcement on both Windows 8, Windows 8.1 & Windows 10 operating systems.
Disabling Driver Signature Enforcement on Windows 8, 8.1 & 10
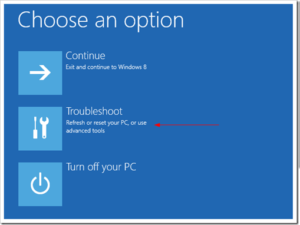
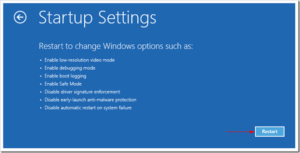
Go to PC Settings and search for “Recovery” and click enter. Under Advanced Startup, You will need to click on the “Restart now” button. Remember to save all your work first before clicking it.
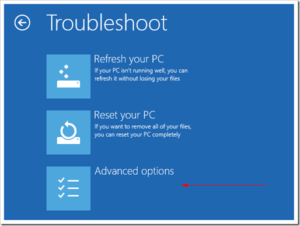
The computer reboots to a startup menu, in which click Troubleshoot.
And click Advanced Options at next screen.
Choose Startup Settings next,
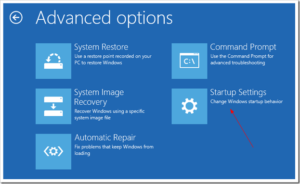
And click Restart button.
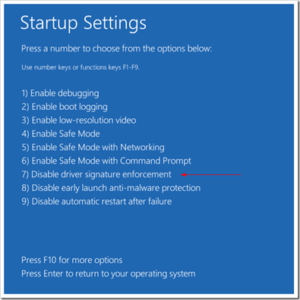
The computer reboots and prompts another menu to choose. One of the items is to Disable driver signature enforcement. Press number 7 or F7 to continue booting to Windows 8 with digital sign enforcement disabled.
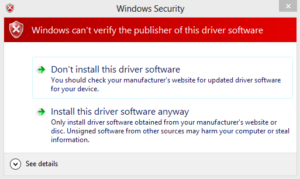
While installing a driver you will get the Windows Security warning window. Choose “Install this driver software anyway”.
Restart computer once again to re-enable the digital sign enforcement.
Biometric enrollment
The following guide is created to assist the person responsible for the biometric enrollment.
The Person who responsible for the biometric enrollment procedure should be patient, professional with good personal communication, before starting the enrollment procedure its very high important to explain the user the enrolling process and the optimal finger area that we want to record/enroll. Prior to enrollment, the person in charge has to explain the concept of enrollment of fingerprint / palm biometric key production.
We recommend to enroll at least 2 fingers (one on each hand) or more in case it is required. For the palm enrollment we recommend to enroll both hands.
The Fingerprint enrollment procedure
Correct enrollment
Placing the finger on the enrollment sensor is high important, full coverage of the finger on the enrollment surface pattern will supply good and accurate template of the enrolled person.
Try to cover the entire area of the reader by the following examples:

Incorrect enrollment
DO NOT put finger on the sensor surface like that:

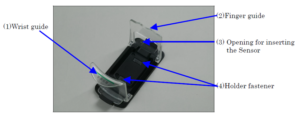
The Palm-Vein enrollment procedure
The following illustrations show the physical view and drawings of the palm guide. Since the palm vein technology is touch-less, it is recommended to use a hand guide for a first 2 month in order to train the users to place a hand correctly.
The following illustration is the range which signifies the vertical length of the palm and shows what part of the palm is being enrolled.

Correct enrollment
Try to cover the palm guide area from the wrist to finger by the following examples:
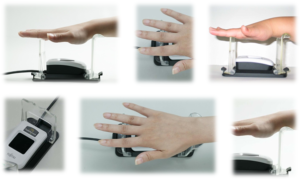
Incorrect enrollment
DO NOT put your hand on the guide surface area like that:

IP address basics & Terminals
- General
Most networks today, including all computers on the Internet, use the TCP/IP protocol as the standard for how to communicate on the network. In the TCP/IP protocol, the unique identifier for a computer is called its IP address.
How does your computer get its IP address? An IP address can be either dynamic or static. A static address is one that you configure yourself by editing your computer’s network settings. This type of address is rare, and it can create network issues if you use it without a good understanding of TCP/IP. Dynamic addresses are the most common. They’re assigned by the Dynamic Host Configuration Protocol (DHCP), a service running on the network. DHCP typically runs on network hardware such as routers or dedicated DHCP servers.
- Assigning static IP address to your computer
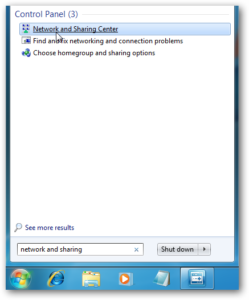
To change the computer’s IP address in Windows 7, type network and sharing into the Search box in the Start Menu and select Network and Sharing Center when it comes up. If you are in Windows 8.x it will be on the Start Screen itself, like the screenshot at the top of this article.
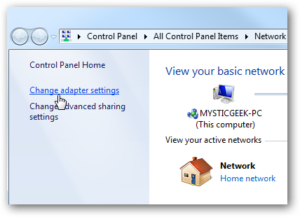
Then when the Network and Sharing Center opens, click on Change adapter settings. This will be the same on Windows 7 or 8.x.
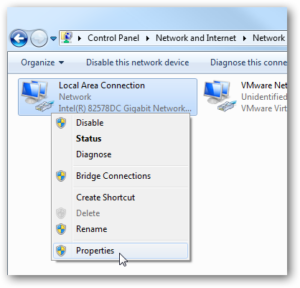
Right-click on your local adapter and select Properties.
In the Local Area Connection Properties window highlight Internet Protocol Version 4 (TCP/IPv4)then click the Properties button.
Now select the radio button Use the following IP address and enter in the correct IP, Subnet mask, and Default gateway that corresponds with your network setup. Then enter your Preferred and Alternate DNS server addresses. Here we’re on a home network and using a simple Class C network configuration and Google DNS.
Check Validate settings upon exit so Windows can find any problems with the addresses you entered. When you’re finished click OK.
Now close out of the Local Area Connections Properties window.
Now you can open the command prompt and do an ipconfig to see the network adapter settings have been successfully changed.
- Usefull Tools
The most useful tool is a Windows command promt (cmd).
A command prompt is an entry point for typing computer commands in the Command Prompt window. By typing commands at the command prompt, you can perform tasks on your computer without using the Windows graphical interface.
To open the Command Prompt window, click the Start button  –> All Programs –> Accessories, and then click Command Prompt.
1. To find out your current IP address settings, type “ipconfig” command and click “Enter“. The IP settings will appear.
2. To view the Address Resolution Protocol (ARP) cache, type “arp -a”. This will show all the IP and MAC addresses in your network.
3. To test and verify connectivity from the computer to some IP address, type “ping” command and then type a space and IP address you want to check connectivity to. For example: “ping 192.168.1.15“
- Finding & connecting IdentyTech terminals
All of Identytech are are shipped with the following IP settings:
IP address: 192.168.1.1
Subnet Mask: 255.0.0.0
Gateway: 192.168.1.1
If your network setting supports assigning of DHCP addresses, once you plug the terminal to the network, the IP address will be automatically assigned to the terminal.
In case the IP address was not assigned automatically, it has to be set manually. In order to do so, you will have to assign a “Static” IP address to your PC with the following :
IP address: 192.168.1.15
Subnet Mask: 255.0.0.0
Gateway: 192.168.1.1
(To assign a static IP please navigate to the top of the page to “Assigning static IP address to your computer” section.)
Once the address is assigned, you will be able to see the terminal in the management software and change its IP address to desired IP settings.